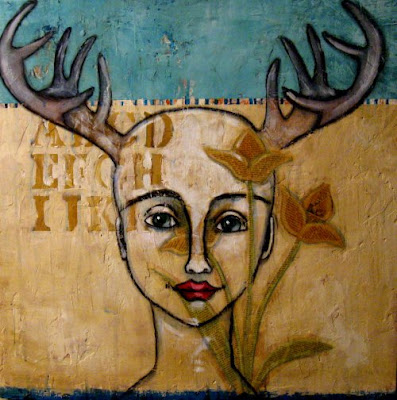
Hello!! I painted a painting tonight. It is 24 x 24 inches, on cradled wood panel. Nature Boy asked me to put antlers on it..so, I did. I painted it on plaster, with acrylics (Golden's Fluid Acrylics). This is the finished painting:
First, after Nature Boy had made the cradled panel for me. I covered the entire piece (front and sides) with PLASTER. I used a large palette knife, and just went in one direction, then the other, (making an "X" motion) over the entire thing:
After it dried (it'll dry overnight)...I took some Indian Yellow Hue and Quin. Nickel Azo Gold, put it in a small plastic container, watered it down a bit...(not too much, because the plaster is very absorbent...), took a large house painting brush, and covered the entire front with it. I then put some white into my watery paint (just a drop or two), and made some areas lighter.
Next, I took my large palette knife, mixed some white with a little Naples Yellow Hue, and paletted it randomly over the entire surface. I did this quite messy, and very quickly.
Next, I took a stamp pad of Ranger/Tim Holtz Distress Ink (vintage photo colored), laid it flat on the panel and rubbed all over it.
After that..I took some Phthalo Blue (green shade), and watered some down in a clean container..took the large house painting brush, soaked it all up and drug it across the painting. I let it drip heavily. Then I let it all dry.
I had a letter stencil sitting nearby..so I thought that I would take some Yellow Ochre and white, and stencil it onto the painting...
At this point, I sat back and looked at what I thought might possibly be the ugliest pile of crud (being nice here), that I have ever painted..::laugh::: I hated it. I made gagging noises. I wanted to puke. Yes!! It was UGLY. So, I got out my trusty blue painter's tape, and taped off the area directly above the letters.
I mixed some Yellow Ochre and White, not mixing them really well..just swishing them around a bit, took my large brush, and painted everything lightly below the tape. Working my way around the letters. I dried that with a hair dryer, then pulled the tape off.
Then, I left a 1/2 inch gap, and put the painter's tape across the painting again. This time, I mixed Phthalo Blue (green shade), Naples Yellow Hue and white. I brushed the top part of the painting with this color. Dried it with the hair dryer, and then pulled the tape off.
This left a wonderful little strip of the original background right across the upper portion. I REALLY like the detail of it..and it's my favorite part of this whole painting.
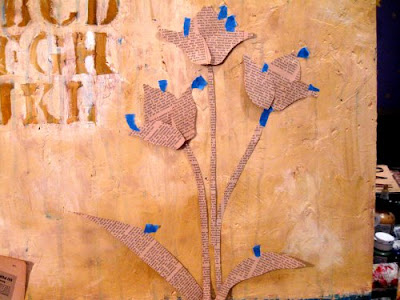
I really liked the painting at this point. I almost stopped..but, decided it needed something more. So, I walked by the tulip painting that I did the other night, and thought that those would look cool on this painting..but I didn't want them purple, and decided to cut them out of old magazine (1940's, I think) paper. I cut the stems, leaves and flowers out in parts. Just sort of free handed the whole thing, and I took tiny pieces of the blue tape and taped them to the painting, to get a feel of the composition and all...
I kept cutting and taping until I was happy with it...
When I got them like I wanted them, I used Golden's Matt Medium to glue them to the panel. I painted around the flowers with the Matt Medium, and it left a darker line, which I liked. But--since the whole thing had a plaster base, the plaster showed where I had put the medium (which was great)..just be careful if using plaster..and don't go hog-wild with the medium..because it will show up.
I covered the top of the paper flowers lightly with the matt medium, and dried it with the hair dryer..then I watered down a little green paint, and painted the stems and leaves, making sure it was watery enough to show the writing through the paint. I continued, and did the same with the flowers, Then took a tiny bit of white and painted highlights...
At this point..Nature Boy came in, proudly holding his drawing of a pair of deer antlers..and wanted me to put them in a painting somehow..so, I sat back and had to visualize how these "antlers" were going to work in this painting. I decided to figure out how big I needed them, and I drew one antler out on a piece of tar paper, and cut it out--so that I would have a pattern to use. I used the pattern of the girl's face with it, the one that I made a couple of weeks ago..and taped them on the painting. I had one antler, and just flipped it for the other side..outlining the whole deal with a pencil.
I then took an oil pastel crayon and did my heavy outlines, smeared them all with my finger (which I cleaned on my shirt--because that's what I do)..and painted the eyes...
Then I painted the antlers with a chocolate colored Golden's glaze, and highlighted some areas, and painted the lips...and POOF..a finished painting...
Live Artfully!!


22 comments:
Thank you so much for sharing!! I love seeing the process. And I love to let paint run down my paper and see what happens. This is a fun collage!!
LOVE this step by step - thank you so much, I've learnt so much reading this.
And that stripey stripe does indeed look fabulous!
So nice to see the process! VERY creative!!
This was really cool Suzan - very neat to see your process.
I had to laugh out loud when you thought it was a pile of crud ( or other words!)
Cheryl
How cool!! Loved the tutorial explaining the process too! I gotta say, she is the most beautiful deer I have ever seen, and she even has quite a nice personality!! Love her!
I love this piece, and thank you for the step by step. It's fun to see how it all came together.
Love it. You've come a long way since the journal pages...
I like how you found a way to integrate Nature Boy's antlers. So cool.
- Jazz
PS: and I love seeing how the finished product actually came into being.
- Jazz
nice little tutorial... fun to watch your process.... yona
Wow I just loved this post! Watching your process, and hearing your thoughts! Very inspiring! I too love that line in the middle. This is a great piece. Very interesting, with a touch of humour and loads of depth! The tulips became so dimensional with the white outline! Thanks for sharing. I admire your work so much!
Hugs Giggles
This is what I love to see! I absolutely love progression posts! I think it turned out really cool! To the average eye...no one would ever guess it had so many layers. I would love to see more of these!! Keep up the good work!
WOW!! :)
This my dear, is utterly fabulous. Superb ingenuity and imagination. The strip from the original is my favorite part also. So cool. Thanks for sharing with someone who looks in on your blog from time to time. You know, to gush and sigh. Tina
I love this painting - thanks for the tutorial!
What a great post! Thanks for the walk-through on how to do this!!
-Joy
ah Suzan, love this, and it was wonderful to see the process - thanks for showing us.
Thank you for posting your procedure. I really admire your work and it is very interesting to see the process.
Thanks so much for all the detailed description and pictures! I love reading about other artist's process!
Thanks for showing the step by step. I really appreciate the work you put into the post. And I love to see the different approaches different artists take to create.
Susan, way cool painting!! I like how you showed its evolution. Thanks!
Mary
Thanks for posting such great instructions! My friend and I followed your tutorial and were so happy with how it turned out. I will reference your blog when I post my finished piece. :)
-Joy
I just have to say you're amazing. I loved seeing your step by steps, even when it ended up you painted over most of your beginning work. Love seeing a glimpse into your mind.
Post a Comment